If you are searching for How To Upload Your Files (A Song) On Audiomack for free, this article is for you.
Here at pliggthis.com music industry is one of the businesses that we endorse. We search and discover ways of which we can support independent musical business persons in getting the work done, easily.
Today, we share with you the way of which you can get your song(s) and other audios on audiomack for free and in few important steps.
A Brief Information About Audiomack
Before we continue, it is preferable l to share some information about Audiomack. We will try to be brief as well.
AUDIOMACK is a top classed Music streams and downloads platforms where you can upload, stream and download any song for free!
AUDIOMACK offers music distribution services for record labels, independent artists, producers and other creatives across their platforms (their website and music app).
If I may ask, are your songs on Audiomack? If no, you should get them on Audiomack as soon as possible.
Also, you don’t have to worry about how much it will cost because Audiomack isn’t charging any uploading fees!
Infact, the only cost to get your songs on Audiomack should be a little of your time.
Isn’t that interesting? It becomes more interesting that you can upload and release your songs on Audiomack by yourself.
That said, here is our guide in 8 steps to upload and release your songs on Audiomack!
How To Upload A Song On Audiomack For Free
Below are 8 steps to upload your song(s) on audiomack for free.
1. Create or Register an account
First things first, do you have an account on Audiomack? If you have, you should create an account right away!
2. Click on the “Upload Your Music”
Assuming you have already created your account, the next thing to do is click on the orange button that says, “Upload Your Music.”
Advertisement
3. Select Upload Type
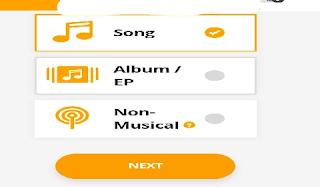
After clicking the “Upload Your Music” button, you will be brought to a page like the one in the image below..
Advertisement
On this page, you will be required to select the type of file you want to upload.
In this case, you will click on “Song” then “Next.”
4. Upload Your File
After you must have followed the previous steps, you will be required to upload your file!
Hope you have your song(s) ready in any of the files which Audiomack supports?
See the image below: (coming soon)
So you have to choose your file and upload. When the upload is 100%, you click on “Next.”
5. Fill The Basic Information
Here, you will require to give Informations including uploading artwork for your song(s), artist name, song title, names of artists you featured in your song, producers alike!
You will also have to provide the metadata and release date for your song.
6. Add Metadata For Your Song(s)
For the metadata, you are required to write about your song.
You are encouraged to make it as information and attractive as possible, but it shouldn’t say what the song is not!
7. Set Release Date For Your Song(s)
Do you have a date you would like to release your song? You can select the date for your song(s) to go live on Audiomack by setting the release date.
If you want the song or songs to go live immediately on the platform, it’s easy and available in the same place.
8. Finish
After completing all the steps above, the final thing you must do to get your song distributed on the platform, is to click the “Finish” button.
Before doing so, remember you can either make your song(s) private, on promo or public!
Disclaimer: this information is only for educational purposes.
If you have any questions regarding these processes, kindly ask in the comment section and such will be given due attention as soon as possible.
For Guest Posting and suggestions, kindly Contact Us.


